Banner image by Mike116

Banner image by Mike116

Author Topic: The Infamous Uberti (and others) Short Arbor  (Read 4513 times)

Offline Captainkirk

  • Administrator Extraordinaire and Part-Time Gunslinger
  • Administrator
  • Hero Member
  • *****
  • Posts: 8764
  • "Never said I didn't know how to use it" M.Quigley
    • View Profile
The Infamous Uberti (and others) Short Arbor
« on: June 17, 2022, 09:17:16 AM »
One of the most FAQ regarding BP revolver tuning on Open Top Colts is regarding the infamous Uberti (and other makes) Short Arbor issue, in which driving the wedge in further closes up the cylinder gap to the point where it locks up the cylinder. This does not seem to affect late model CAM/CAD Pietta revolvers; it seems Pietta addressed and corrected this issue when they switched to CAM/CAD production in 2003.
There are many fixes for this, all, which seem to work if you understand the concept that the arbor should bottom out in the arbor bore of the barrel with the wedge driven in firmly and having a resultant .002-.005 gap between the cylinder face and barrel forcing cone.
Here are some techniques that the pros use.
"You gonna pull those pistols, or whistle Dixie?"

Offline ShotgunDave

  • Gun Geezer
  • Administrator
  • Hero Member
  • *****
  • Posts: 5046
  • Black Powder Aficionado
    • View Profile
Re: The Infamous Uberti (and others) Short Arbor
« Reply #1 on: June 17, 2022, 10:59:49 AM »
I am definitely not a professional. But this is how I do it. I know there are several ways to do it, and hopefully one of the real pros will come along and show their methods. Until then, here's my way.

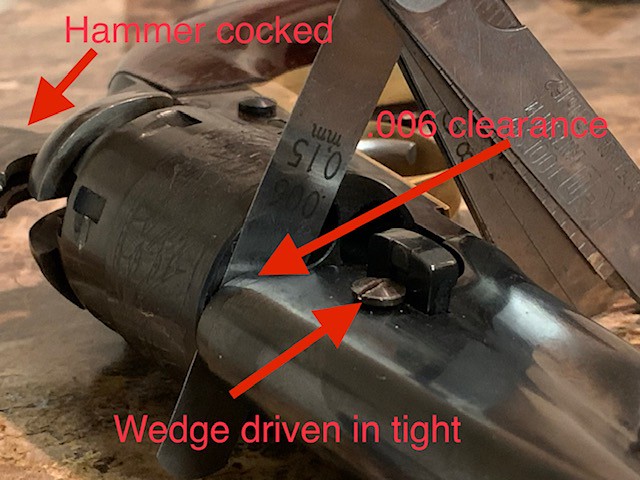
There is one amendment to this article I'd like to make. Instead of a .006" cylinder gap, I am now going for .003" after many discussions with Mike Brackett. .003" is much better for keeping the cylinder face cleaned of fouling.


First thing I do, is disassemble the gun. Pull the wedge and remove the barrel and cylinder. Now clean all the oil off the arbor and down in the arbor hole on the barrel assembly. Set them aside.

All you need to accomplish this modification is, a piece of round stock, the same or nearly the same diameter as the arbor. You can get it at a lot of hardware stores, or metal supply houses. I get mine from an odd place. I have an old rammer plunger off a gun I cut the barrel down on. The plunger is no longer needed, so I use it to slice pieces off to fix short arbors. It's steel and it works just fine. I hate to waste stuff!

So now you need a slice of the steel round stock, to use as a shim. You can cut it however you like, I just do it this way so it comes out square and flat. I use a clamp that is designed to hold round stock for drilling. It's just a block with a "V" in it to support the metal, and a clamp to hold it in place. It looks like this with the round stock clamped in.


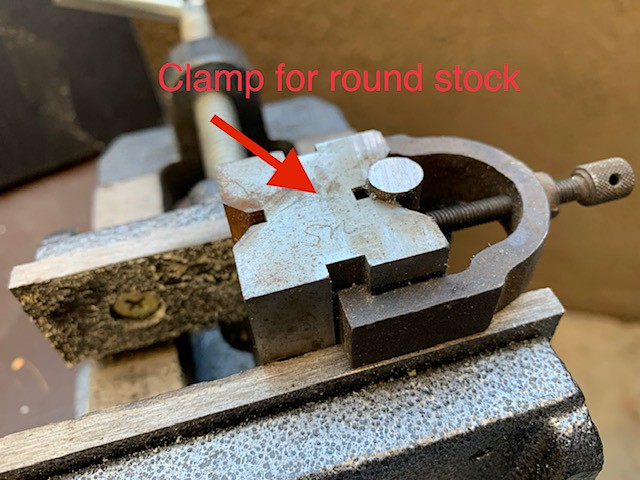
Once the metal is clamped in, as long as you keep your saw blade flat against the clamp, the shim will be flat and square.


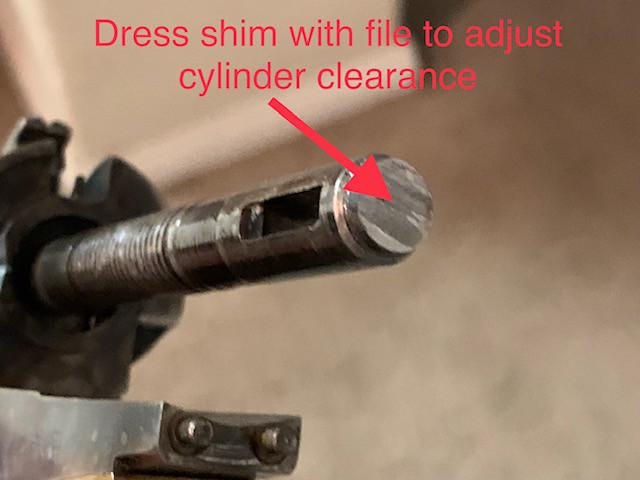
So how do I know how thick of a shim I need? I don't really. I just cut a piece off around .008" and test fit it. Just take your newly cut shim, place it down the arbor hole in the barrel, and reassemble the gun. You'll be able to tell right away it it's too thick or thin. If it's too thick, you can cut another one a little thinner, or use a file and thin it out. If it's too thin, you'll obviously have to cut another one that's thicker.

When you assemble the gun for test fitting, put a feeler gauge in the barrel to cylinder gap. See how big it is. The feeler gauges are just automotive type, available at any auto parts store for cheap. Here's how I do mine.

I'm shooting for a cylinder/barrel clearance of about .006"


Once I'm in the ballpark, I get ready to solder the shim to the end of the arbor. I start by dressing the end of the arbor with a file. Some arbors have a little "teat" sticking up in the center. You need to remove that so the shim will sit flat. You also need to prep the metal for the solder to grab onto.


Once you've done that, it's time to solder. First I warm the arbor up with a torch. Just warm it up. If you get it glowing red, you got it WAY too hot! Just warm it up.


Next, I put a little dab of paste flux on the end of the warm arbor.


Then I cut a little piece of solder off the roll, and set it on the end of the arbor in the flux.


Now I have to get a little creative. I need a way to place and hold the shim, on top of the arbor so I can heat it and have it stay in the proper position. What I do is, I use the handle off one of my old Exacto knives. It does transfer the heat a little, so wear a glove if you think you might burn your fingers. I don't, because the solder melts so fast that the handle barely gets warm.

I just put a little dab of paste flux on the end of the Exacto handle. it acts as a kind of glue. Then I place the shim on top of that, and another dab of flux on the shim.


Now just turn it up on end, and place the shim on the end of the arbor, covering the solder, and hold it there while you heat the shim up with your torch.


It only takes a few seconds for the solder to melt. Just remove the heat and let it cool a few seconds. You'll know it worked when you see the shim settle down onto the arbor, and you'll see a thin layer of solder around the edge of the shim.


That's it!! It's on there and it ain't going anywhere! Now take the gun in the house, and run some warm water on the end of the arbor to rinse the flux off. Flux is acid, and unless you want your gun to rust in short order, clean it off! Then dry it and oil it up good.


Once you have the gun cleaned and oiled, you'll want to reassemble it again. Once it's back together, check the cylinder/barrel clearance again with the feeler gauges. If it's where you want it, You're done! Go shoot the thing! If it's too loose, which it may be now, because the solder will add a small amount to the end of the arbor, just dress the shim with a file and re-check the fit.


Now, you can set the cylinder/barrel clearance to whatever you like. Some guys like it a bit on the bigger side, to account for fouling. Some like a bit smaller. I've seen anywhere from .003 to .006 being touted as optimal. If I get mine to around .005 I'm a happy camper.

Here she is, all back together and ready for action!


Hopefully I didn't bore you with all the pictures and descriptions. I just wanted to be as thorough as I could be, to hopefully help someone. It took me longer to put this post together than it took me to fix the gun. It really isn't hard, just about anyone can do it. I hope it encourages some to give it a try.
"Never trust an actor with a gun."
-Abe Lincoln

Offline Zulch

  • Global Moderator
  • Hero Member
  • *****
  • Posts: 3068
    • View Profile
Re: The Infamous Uberti (and others) Short Arbor
« Reply #2 on: June 17, 2022, 11:13:55 AM »
Awesome tutorial Dave. The pictures and text on pictures in tandem with you explanations are spot on and very easy to understand. Nice!

Offline Marshal Will

  • Global Moderator
  • Hero Member
  • *****
  • Posts: 1428
  • Smile, it makes people wonder what you're up to.
    • View Profile
Re: The Infamous Uberti (and others) Short Arbor
« Reply #3 on: June 17, 2022, 02:14:45 PM »
I do it the same way Dave does. That's because he told me how to do it. I would like to point out a couple things I do. Instead of cutting a shim, I find a steel washer that's a few thousandths thicker than I'll need and solder that on. The solder will squish up through the center but that isn't important because the arbor hole in the barrel has a concave bottom and the outside of the shim is what contacts the barrel. To get a washer thick enough, it's always a little bigger than the arbor but it's easy to dress down. I always make sure to taper the washer so it's smaller than the arbor to allow it to bottom all the way. Once it's on, I dress down the washer to give the gap I want.


For solder I use Brownells Hi-Force 44 which melts at about half the temperature of conventional silver solder.

Edit: you may have to shave down the side of the wedge if it doesn't go all the way in after adding the shim to the arbor.
« Last Edit: June 17, 2022, 02:25:52 PM by Marshal Will »

Offline Zulch

  • Global Moderator
  • Hero Member
  • *****
  • Posts: 3068
    • View Profile
Re: The Infamous Uberti (and others) Short Arbor
« Reply #4 on: June 17, 2022, 03:54:30 PM »
Interesting Marshal👍👍

Offline 45 Dragoon

  • Hero Member
  • *****
  • Posts: 993
  • Newbie
    • View Profile
Re: The Infamous Uberti (and others) Short Arbor
« Reply #5 on: June 17, 2022, 08:25:40 PM »
Thanks guys!! That's great stuff!! Because of the "time" element, here's how I accomplish this task - this is a #12 S.S. sheet metal screw. I use it for Army's /Navy's and a #14 screw for Walkers /Dragoons.
« Last Edit: June 17, 2022, 08:50:23 PM by 45 Dragoon »

Offline 45 Dragoon

  • Hero Member
  • *****
  • Posts: 993
  • Newbie
    • View Profile
Re: The Infamous Uberti (and others) Short Arbor
« Reply #6 on: June 17, 2022, 08:54:56 PM »
Step 1. Cut off the threaded shaft.

Offline 45 Dragoon

  • Hero Member
  • *****
  • Posts: 993
  • Newbie
    • View Profile
Re: The Infamous Uberti (and others) Short Arbor
« Reply #7 on: June 17, 2022, 08:58:35 PM »
The "cut off" side will be the "flat side".


Offline 45 Dragoon

  • Hero Member
  • *****
  • Posts: 993
  • Newbie
    • View Profile
Re: The Infamous Uberti (and others) Short Arbor
« Reply #8 on: June 17, 2022, 09:04:23 PM »
It will look like this when installed - flat side up, round side down.
« Last Edit: June 17, 2022, 09:18:24 PM by 45 Dragoon »

Offline 45 Dragoon

  • Hero Member
  • *****
  • Posts: 993
  • Newbie
    • View Profile
Re: The Infamous Uberti (and others) Short Arbor
« Reply #9 on: June 17, 2022, 09:09:36 PM »
Step 2.  using a drill motor with a Philips head bit, I reduce the spacer thickness by turning the spacer against a bench belt sander (don't forget to turn the sander on!!).
« Last Edit: June 17, 2022, 09:19:44 PM by 45 Dragoon »

Offline 45 Dragoon

  • Hero Member
  • *****
  • Posts: 993
  • Newbie
    • View Profile
Re: The Infamous Uberti (and others) Short Arbor
« Reply #10 on: June 17, 2022, 09:13:58 PM »
Check the gap at the frame / barrel lug. You want this to close first before you "dial in"  the  endshake or barrel /cyl clearance.
« Last Edit: June 17, 2022, 09:21:21 PM by 45 Dragoon »

Offline 45 Dragoon

  • Hero Member
  • *****
  • Posts: 993
  • Newbie
    • View Profile
Re: The Infamous Uberti (and others) Short Arbor
« Reply #11 on: June 17, 2022, 09:14:58 PM »
Getting close
« Last Edit: June 17, 2022, 09:22:36 PM by 45 Dragoon »

Offline 45 Dragoon

  • Hero Member
  • *****
  • Posts: 993
  • Newbie
    • View Profile
Re: The Infamous Uberti (and others) Short Arbor
« Reply #12 on: June 17, 2022, 09:15:53 PM »
Success!!  Notice the wedge is in place and is driven in until it  won't go further.
« Last Edit: June 17, 2022, 09:36:36 PM by 45 Dragoon »

Offline 45 Dragoon

  • Hero Member
  • *****
  • Posts: 993
  • Newbie
    • View Profile
Re: The Infamous Uberti (and others) Short Arbor
« Reply #13 on: June 17, 2022, 09:34:18 PM »
Make sure you drive the wedge in solidly when you're checking for the frame /barrel contact. If you wait until there is contact, the spacer may already be too thin!! You can see a witness mark on the spacer when youve made contact at the frame/lug.
« Last Edit: June 17, 2022, 09:47:01 PM by 45 Dragoon »

Offline 45 Dragoon

  • Hero Member
  • *****
  • Posts: 993
  • Newbie
    • View Profile
Re: The Infamous Uberti (and others) Short Arbor
« Reply #14 on: June 17, 2022, 09:43:42 PM »
Step 3.  I start a hole in two places (one each side). This gives the epoxy an "anchor"  so that if the spacer came loose (not ever likely) the "anchors" would still retain the spacer. (Redundancy)